Lesson: Diesel Engine Management Systems
This topic explains the roles and operation of common diesel sensors and engine control units (ECUs), and gives practical, low-cost testing techniques and a prioritized workflow for diagnostics when professional diagnostic equipment is limited. Emphasis is placed on safe, low-cost, replicable methods suitable for resource-constrained African contexts.
1. Overview — Purpose of Sensors and ECUs
- Sensors monitor engine and environmental conditions (position, temperature, pressure, flow, composition) and provide electrical signals to the ECU.
- The ECU (engine control unit) processes sensor inputs and controls actuators (injectors, pumps, EGR, turbo vanes, glow plugs, idle control) to manage combustion, emissions, and engine protection.
- Typical ECU responsibilities: fuel quantity and timing (including common-rail control), boost/EGR management, limp-home strategies, diagnostics and fault-memory storage, communication with other controllers (CAN/J1939/J1708).
2. Common Diesel Sensors — Function and Operating Principle
Below are the most common sensors on diesel engines, with brief notes on how they operate.
-
Crankshaft Position Sensor (CKP)
- Role: engine speed and crank angle; critical for injection timing and starting.
- Principle: magnetic (variable reluctance) or Hall-effect; outputs pulse or AC waveform proportional to speed.
-
Camshaft Position Sensor (CMP)
- Role: cylinder identification and timing synchronization.
- Principle: similar to CKP (Hall or VR), produces position pulses.
-
Rail Pressure Sensor (Fuel Pressure Sensor)
- Role: measures common-rail high pressure; used to control injection quantity.
- Principle: piezoresistive/piezoceramic transducer; typically a 0.5–4.5 V signal proportional to pressure.
-
Boost / MAP (Manifold Absolute Pressure) Sensor
- Role: measures intake manifold absolute pressure; used for fueling and turbo control.
- Principle: piezoresistive transducer; output typically 0.5–4.5 V varies with absolute pressure.
-
MAF (Mass Air Flow) Sensor (less common on heavy diesels)
- Role: measures actual air mass entering engine.
- Principle: hot-wire or hot-film; outputs voltage or frequency.
-
Intake Air Temperature (IAT) Sensor
- Role: corrects air density calculations; affects fuel delivery.
- Principle: NTC thermistor (resistance falls as temp rises).
-
Coolant Temperature Sensor (ECT)
- Role: engine warm-up, idle control, emissions.
- Principle: NTC thermistor; ECU expects resistance vs temperature characteristic.
-
Oil Pressure Switch / Sensor
- Role: oil pressure monitoring; may provide low-pressure warning or analog pressure value.
-
Exhaust Gas Temperature (EGT) Sensor
- Role: protect turbo and aftertreatment; used for regen logic.
- Principle: thermocouple or thermistor.
-
NOx, O2, Particulate (DPF) Sensors (modern systems)
- Role: emissions control and aftertreatment management.
- Principle: wideband lambda (oxygen), NOx sensors (electrochemical), differential pressure across DPF (pressure sensor).
-
Knock Sensor
- Role: detects abnormal combustion knock (more common in gasoline but present in some diesels).
-
Accelerator Pedal Position Sensor / Throttle Position Sensor
- Role: driver demand input; usually redundant two-channel potentiometers for safety.
-
Fuel Temperature Sensor
- Role: adjusts fueling for fuel density/viscosity changes.
3. Typical Sensor Signal Types
- Analog voltage (0.5–4.5 V common for pressure/temp sensors)
- Resistance (thermistors like ECT/IAT)
- Frequency/AC (VR crank sensors)
- Digital / square wave (Hall-effect sensors)
- CAN / J1939 messages (ECU-to-ECU communication)
- High-current circuits (glow plugs, fuel pumps)
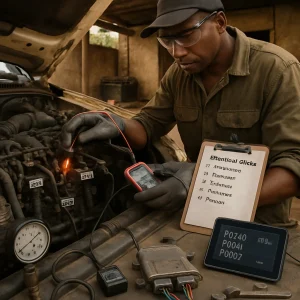
4. Low-Cost Tools Recommended
- Digital multimeter (DC volts, AC, resistance, frequency)
- Test light (12 V)
- Noid light for injector pulse checking
- Hand vacuum/pressure pump (for MAP and vacuum-actuated parts)
- Basic fuel pressure gauge (mechanical), if available
- Simple OBD/diagnostic code reader supporting J1939 or OBD-II (inexpensive Bluetooth dongles may work for light vehicles — be cautious of compatibility)
- Infrared thermometer (handheld, inexpensive) or thermocouple for temperature checks
- Basic hand tools, contact cleaner, wire brush, dielectric grease, insulating tape, zip ties
- Battery terminal cleaner and jumper cables
5. Safety and Practical Considerations
- High-pressure fuel systems are dangerous: always relieve rail pressure before disconnecting lines or components.
- Disconnect battery when doing major electrical repairs; avoid shorting ECU power pins.
- Protect hands and eyes; use gloves and goggles.
- Ensure vehicle is immobilized (handbrake, wheels chocked) before cranking tests.
- Keep sensors and connectors clean from dust, water, and salt—corrosion is a common failure point in harsh environments.
6. Prioritizing Checks When Diagnostic Equipment Is Limited
When tools are scarce, follow a prioritized, practical workflow that quickly isolates common causes of no-start, misfire, limp mode, or low performance:
-
Power & ground
- Battery voltage (resting and cranking)
- Main power fuses and relays to ECU and fuel pumps
- Engine/ECU ground connections (clean and tighten)
-
Fuel supply basics
- Fuel in tank, clogged filters, lift pump operation, suction leaks (air ingestion)
- Fuel pressure at mechanical gauge (if available) or listen for pump operation
-
Crank & cam reference
- CKP/CMP sensor presence — no pulses = no injector timing → no-start
- Check sensor wiring, connector corrosion, and resistance/specs
-
Rail pressure
- Confirm rail pressure or pump operation — insufficient pressure = no injection or poor performance
-
Air intake & turbo
- Inlet restriction, intercooler leaks, turbo vane actuator function
-
Coolant / temperature sensors
- Cold start behavior often linked to ECT and glow plug systems
-
Communication / ECU status
- Quick scan for codes if a reader is available; if not, check ECU power and wake signals
This order finds faults that most commonly cause total engine failure or immediate performance loss and which are often easy to verify without advanced tools.
7. Low-Cost Test Procedures (Step-by-step)
These procedures are economical and rely on common tools such as a multimeter, test light, hand pump, and a noid light.
A. Crankshaft Position Sensor (CKP)
- Visual: inspect connector and wiring for corrosion, broken insulation, or oil ingress.
- Resistance (for some types): with sensor disconnected, measure resistance across sensor terminals and compare with service spec where available.
- AC output: with engine being cranked (assistant required), back-probe sensor output and measure AC volts or frequency. A VR sensor will produce an AC voltage that increases with cranking speed. Hall sensor will show pulsed 0–12 V or 0–5 V.
- If no signal and wiring good, temporarily swap with a known-good sensor (if available) or confirm wiring continuity to ECU.
B. Coolant Temperature Sensor (ECT)
- Measure resistance at sensor body when engine cold and warmed. For NTC type, resistance decreases with rising temperature. If sensor reads open or fixed value, it is faulty.
- Alternatively, measure voltage between sensor and ground with key on: expect change as engine warms.
C. MAP (Boost) Sensor
- Check 5 V reference (or battery-derived reference) from ECU to sensor using multimeter.
- Check ground continuity from sensor to chassis/ECU ground.
- With key on, measure output voltage; typical values: near atmospheric ~0.5–1.5 V (depends on system) and will change when you apply vacuum or pressure using a hand pump. If output does not change, suspect sensor.
D. MAF Sensor (if fitted)
- Visual: clean with MAF cleaner if dusty (do not touch the element).
- Measure output voltage at idle — typical ranges vary; consult manual or compare to another vehicle if possible.
E. Fuel Rail Pressure Sensor and Common-Rail System
- Visual and connector check.
- If a mechanical gauge available, compare gauge reading to ECU-reported value (if codes or reader available) to detect sensor vs pump faults.
- If no gauge, monitor engine behavior: no-start + pump noise may suggest pump failure; low pressure faults typically set codes or limp mode.
- Safety: do not loosen fittings while system pressurized.
F. Injector Electrical Test (Noid Light)
- Disconnect injector connector and connect noid light to the connector.
- Crank engine or operate starter: noid light should flash showing ECU pulses. No flash — check ECU driver or wiring.
- Measure injector resistance across coil contacts to check for opens or shorts (cold values vary by type).
G. Glow Plug System
- Check battery and relay for power during glow cycle (key on).
- Measure current draw across glow circuit (large current expected); no current indicates relay or fuse fault.
- Remove and measure individual glow plug resistance; grossly high or open indicates bad plug.
H. DPF Differential Pressure Sensor
- Measure sensor voltage change while engine speed changes or use hand pump to apply pressure difference.
- If sensor fixed or open, DPF regen may be inhibited.
8. Interpreting Results — Common Failure Modes
- No cranking signal from CKP: engine will not start or will stall soon after start.
- Low or no rail pressure: no fuel injection — check lift pump, filter, pump drive, and safety interlocks.
- Erratic MAP/MAF readings: poor fueling, black smoke, low power — check for air leaks, clogged filter, dirty MAF.
- ECT stuck low/high: hard starting, overfueling or lean conditions until engine warms.
- Corroded grounds and connectors: intermittent faults, misfires, false sensor readings — clean, repair, and protect.
- Loss of communication on CAN/J1939: multiple systems may enter limp mode; inspect power/ground to ECU and main connectors.
9. Practical Field Tips for Resource-Constrained Contexts
- Prioritize cleaning and securing all main power and ground connections — often the cheapest, highest-impact fix.
- Keep spare basic consumables: fuel filters, simple sensor types (MAP, ECT), fuses, and a small stock of wires and connectors.
- Use locally available materials for temporary sealing/protection (heat-shrink, dielectric grease, self-amalgamating tape) but plan for permanent repairs.
- Build a simple test kit: multimeter, noid light, hand vacuum pump, basic mechanical fuel gauge, and a cheap J1939/OBD2 reader that supports the vehicle fleet you service.
- Train operators to perform pre-start checks: fuel level, battery condition, visual leaks, warning lights — early detection prevents major failures.
- Document symptoms and tests performed; this assists in trend-spotting and more accurate parts ordering.
10. Quick Diagnostic Checklist (When Time/Tools Limited)
- Verify battery voltage ≥ 12.4 V (resting). If low, charge or jump-start.
- Check main engine and ECU power fuses/relays.
- Confirm good engine/chassis ground — clean and tighten.
- Listen for lift pump running during key-on (or measure presence of pump power).
- Check for engine crank signal (CKP) with multimeter/visual waveform if possible.
- Verify presence of rail pressure (mechanical gauge or audible pump operation).
- Check coolant temperature sensor behavior if difficult starting or performance issue.
- Inspect air intake for leaks and turbo actuator movement.
- If ECU communication available, read fault codes; prioritize codes linked to power/starting and rail pressure.
- Secure connectors and protect exposed terminals from dust and moisture.
11. When to Seek Specialist Support
- If tests suggest internal fuel pump mechanical failure (high-pressure pump) or injector mechanical faults — specialized tools and cleaning rigs are needed.
- If ECU appears to be failing (loss of communication despite power and ground), replacement or reprogramming facilities may be required.
- For high-pressure common-rail servicing, specialized gauges, test benches and certified technicians are recommended for safety.
12. Summary
- Understanding the role and basic operation of each sensor and the ECU allows focused, economical troubleshooting.
- Start with power/ground, fuel supply, and crank/rail sensors — these cause the most severe faults and are often simple to test.
- Use a multimeter, noid light, hand vacuum/pressure pump and a modest code reader to perform most field checks.
- Clean and protect connectors, grounds and power circuits — preventive maintenance here reduces many faults in harsh environments.
- Always respect safety rules around high-pressure fuel and high-current circuits.
This guidance provides a practical, low-cost framework to diagnose and maintain diesel electronic systems in resource-constrained settings while preserving safety and maximizing uptime.